We use cookies, including cookies from third parties, to enhance your user experience and the effectiveness of our marketing activities. These cookies are performance, analytics and advertising cookies, please see our Privacy and Cookie policy for further information. If you agree to all of our cookies select “Accept all” or select “Cookie Settings” to see which cookies we use and choose which ones you would like to accept.
At LG Air Solution, safety is our top priority in every aspect of our innovative products. With our detailed instructions provided in the guide below, you’ll be empowered to navigate each step of installing THERMA V R290 heat pump with confidence and efficiency.
The LG R290 Monobloc heat pump stands at the forefront of HVAC technology, offering unparalleled efficiency and a low environmental impact with its use of R290 refrigerant. For HVAC installers, understanding the heat pump installation process of this system opens up opportunities to lead in eco-friendly solutions. Mastery in setting up this system ensures you and your business stay relevant and in demand in the evolving HVAC market.
Before Installation
When initiating the installation of the R290 Monobloc heat pump, several preliminary steps are essential for a smooth process. Begin by verifying the model number on the packaging to confirm the correct product has been received. Inspect both the packaging and the product meticulously to ensure there are no signs of damage. Additionally, it is crucial to measure the dimensions of the installation area to guarantee there is sufficient space for the system's optimal operation.
Prior to the installation of the heat pump, careful preparation of the foundation and drainage for the outdoor unit is crucial. Ensure that the foundation is constructed higher than the local average snowfall height to prevent snow accumulation interfering with operation, and verify that the condensate water drainage is frost-free to avoid freezing. Additionally, it is necessary to complete any drilling through the building's walls in advance to facilitate a smoother installation process. Utilizing a leak detector both before and immediately after unpacking the unit is essential to confirm there are no leaks. Lastly, verify that all parts required for the installation are supplied to avoid any delays or issues during the installation process.
The Necessary Tools
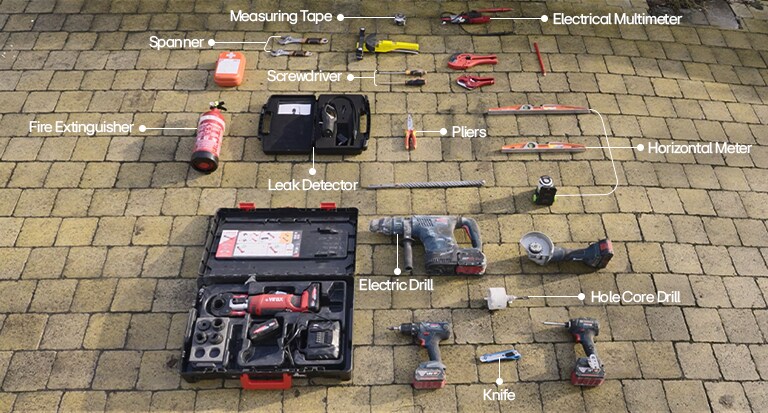
To complete installation, you will require the following tools:
Product Installation
Getting Things in Place
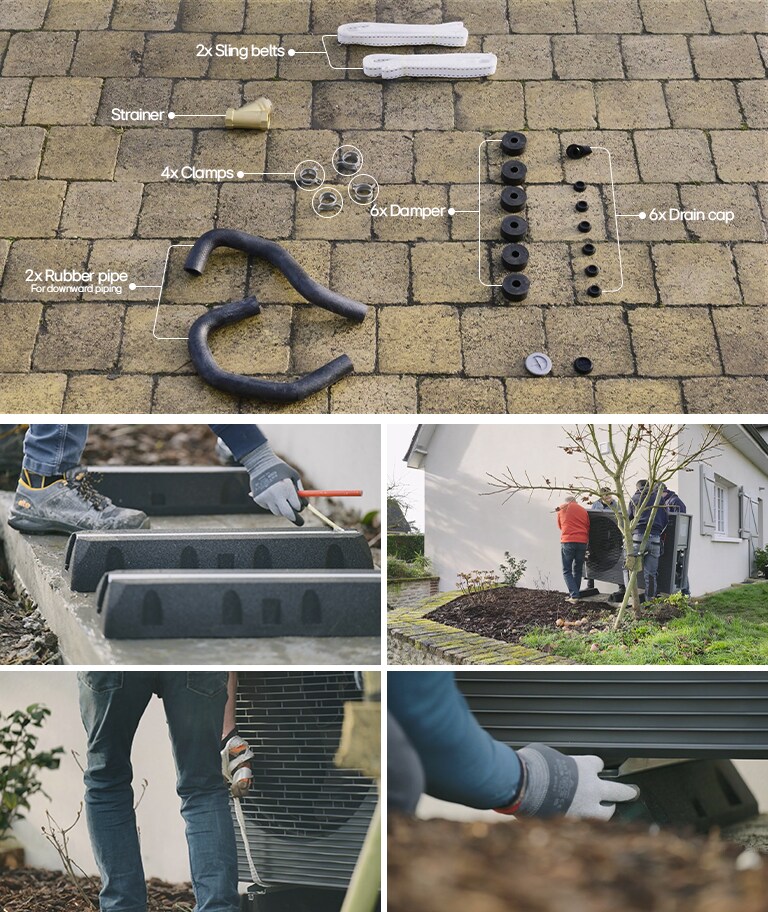
To begin the installation of the R290 Monobloc heat pump, transport the unit to its designated location using the sling belts provided.
1. Secure the unit firmly in place with six sets of M12 foundation bolts, nuts, and washers, ensuring the bolts protrude 20 millimeters from the foundation surface for a stable foundation.
Next, let’s focus on installing the indoor unit.
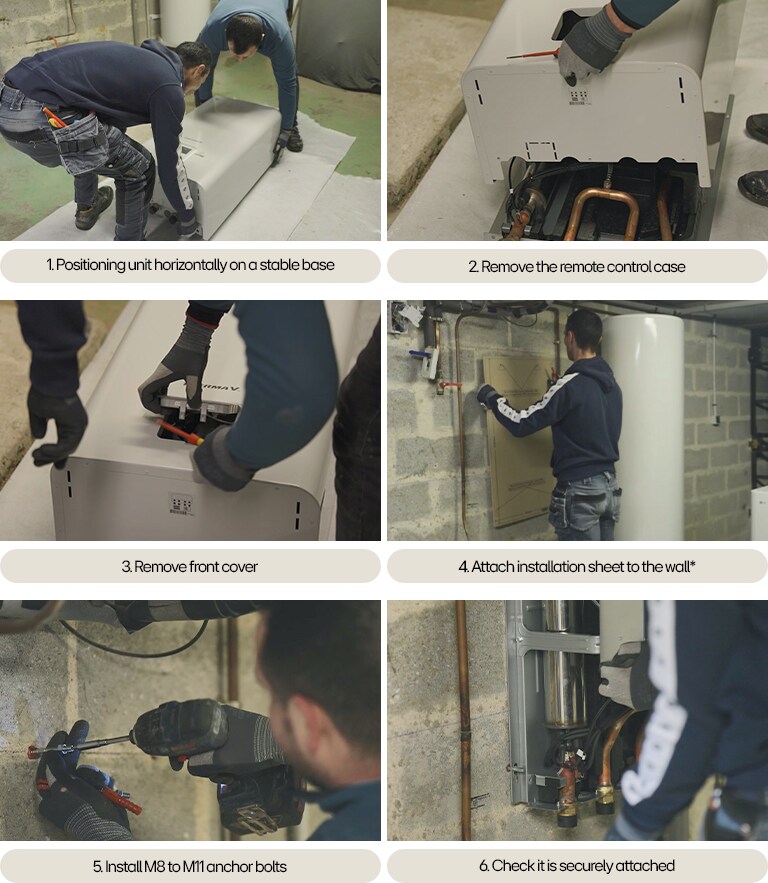
1. It should be positioned in a room that offers easy access to both the outdoor unit and the heating system, while also respecting minimum space requirements for maintenance to prevent air circulation issues and overheating.
2. Select a location with a water-resistant floor and access to the house's drainage system, ensuring it is free from flammable materials and safeguarded against potential rodent damage.
With these initial steps completed, you are now ready to proceed with mounting the indoor unit, setting the stage for a successful installation.
*In step 4 this sheet, found between the Styrofoam and the indoor unit box, is crucial for accurately marking the bolt locations. Ensure the sheet is level to guarantee that the supporting plate and the indoor unit are correctly aligned.
Once completed, the indoor unit will be properly installed and ready for use.
Getting Connected
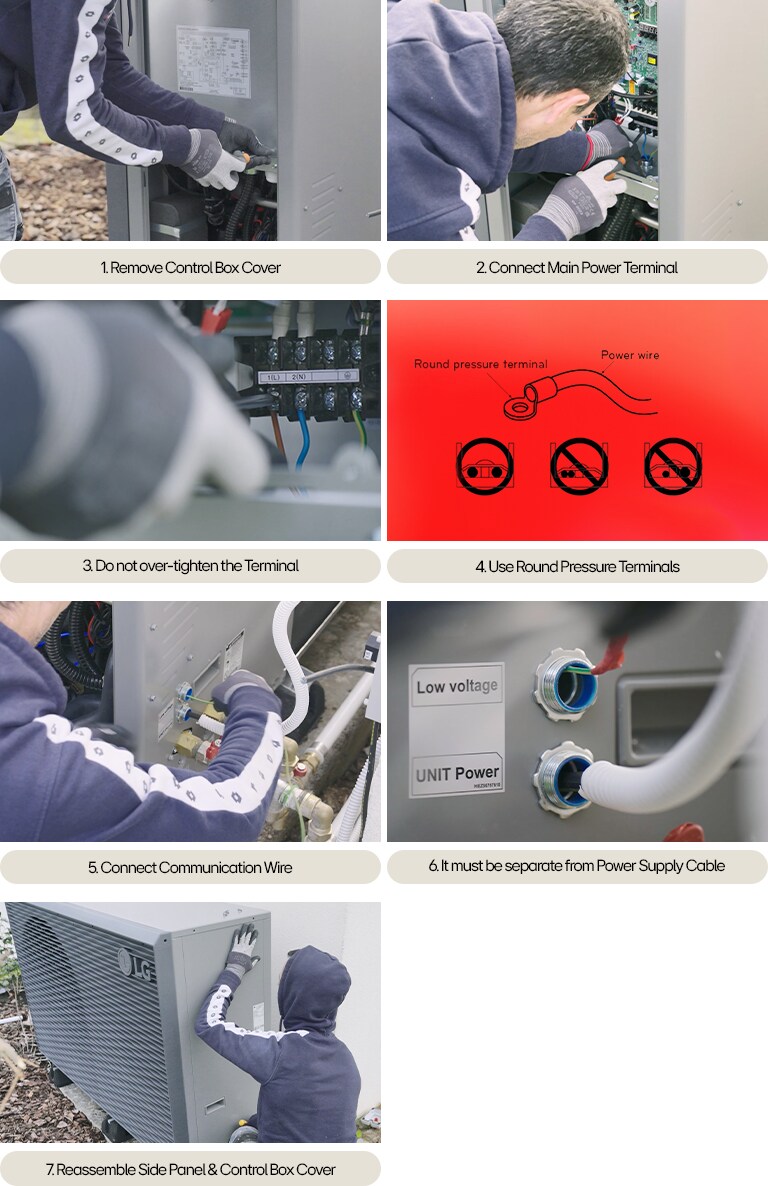
1. Begin connecting the heat pump to power by carefully disassembling the side panel and the control box cover from the outdoor unit.
2. Proceed to connect the power cable to the main power terminal, ensuring that the earth cable is securely connected at its dedicated terminal.
3. Utilize cable clamps or cord clamps to prevent any unintended movement of the power cable, taking care not to over-tighten the terminal screws to avoid damage.
4. Employ round pressure terminals for connections to the power terminal block; if these are not available, adhere to alternative connection schemes.*
* It is critical to ensure that the power cable does not touch the copper tube and that the cord clamp is firmly fixed to sustain the connection of the terminal.
5. Next, connect the communication wire between the outdoor and indoor units using a shielded cable.
6. Ensure that this cable runs through the dedicated conduit to keep it separate from the power supply cable.
7. Conclude the installation by reassembling the side panel and control box cover onto the outdoor unit, securing the screws tightly.
This direct approach ensures a stable and efficient installation process for the LG R290 Monobloc heat pump, emphasizing precision and adherence to guidelines for optimal performance.
Indoor Unit Electrical Connectivity
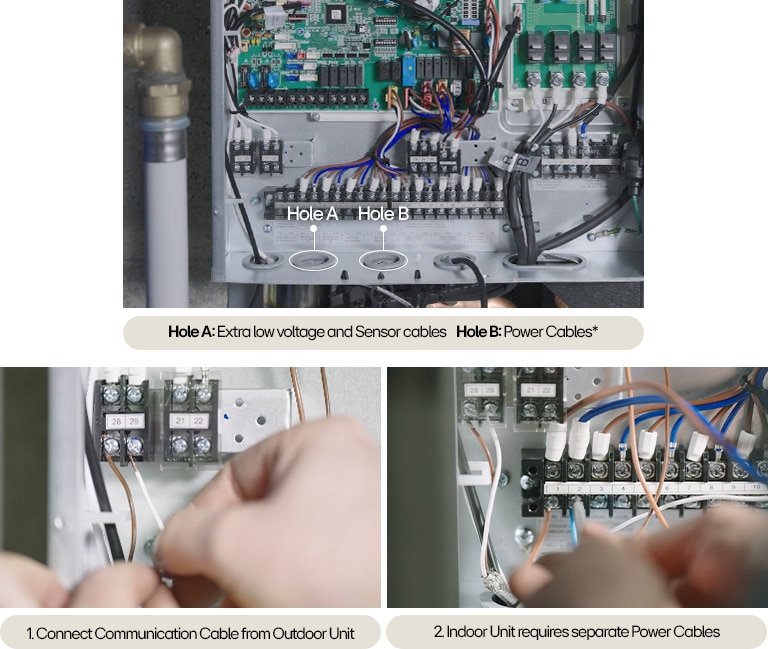
Now, let's proceed with the electrical connections at the indoor unit.
*It is crucial to maintain a separation between the power lines and communication lines to avoid interference.
Water Pipe Charging
1. Proceeding to the water charging phase, commence by opening all valves within the water circuit and connecting the supply water.
2. Following this, remove the caps from the air vents located at both the indoor and outdoor units to initiate the purging process for any air present within the water circuit.
3. Continue this process until the pressure gauge on the control panel indicates the attainment of the preset value, signaling a halt to the water supply.*
*It is essential to monitor the pressure using the remote control to ensure it aligns with the expected values.
4. Once the pressure levels are satisfactory and aligned, the next step involves a thorough inspection of the pipe insulation to confirm its integrity and readiness for operation.
Accessories
Various accessories, such as valves, external pumps or sensors can be connected to the indoor unit. Refer to the installation manual or individual schematic for details. Make sure that the DIP switch settings match the actual installation.
Suggested shorter conclusion: Mastering the R290 Monobloc heat pump installation is crucial for HVAC installers to ensure efficient and flawless setups. Knowing every step enhances system performance, extends equipment life, and guarantees customer satisfaction. This guide enables you to confidently handle installations, tackle challenges, and improve service quality, bolstering your expertise and market standing.
Related Articles
*Products and solutions may vary according to country and operating conditions.
Contact Us
Please contact us for more information, and we will get in touch with you soon.
